Easy Login Setup Steps | Mywifiext
To connect to mywifiext.net, The steps are as follows:
- Connect the Netgear Extender to a power source.
- Now, hold your breath and wait for the LED to turn green.
- Connect to the extender after the power light becomes green.
- The device’s LED should solidify into a solid green colour.
- Any web browser will suffice. Go to the address bar and type Mywifiext.net in there.
- Click on “New Extender Setup” Button.
- Enter Default Login Credentials i.e “Admin”.
- Hit the Finish Button.
WWW.MYWIFIEXT.NET
Click Here For Netgear New Extender Setup
Mywifiext.net New Extender Setup
LOGIN FOR A MYWIFIEXT.NET WIFI EXTENDER SETUP
mywifiext.net is a website that allows you to set up your own wireless network.
- Connect your device to the Netgear Ext network to complete the Mywifiext.net setup instructions.
- Open any web browser, such as Google Chrome, and navigate to the mywifiext setup page.
- Go to the browser’s address bar and type in the web address.
- In the address bar, type 192.168.1.250.
- The new extender setup button will appear, and you will need to click it.
- Create an account now and click Continue to access the mywifiext setup page.
Easy Login Setup Step-By-Step Guide
Mywifiext.net setup guide

How to Connect with Netgear WiFi Range Extender Setup?
If you’re facing any trouble regarding your WiFi Range Extender then below mentioned are few steps to Setup your AC1200 Extender Setup:
- Open your Netgear WiFi Range Extender.
- Plug it in a power source.
- Now, wait till the lights get solid.
- Grab a smart device and connect with ‘Netgear_ext’.
- Now , open any web browser in your laptop.
- Go to URL i.e www.mywifiext.net.
- Now hit ‘new extender setup’ button.
- Fill the default admin credentials.
- hit the finish button.
How to Connect with www.mywifiext.net?
Steps For www.mywifiext.net Login Setup Page
Let’s discuss the step-by -step guide for your Netgear Nighthawk Mesh WifI Extender Setup via Mywifiext.net or Mywifiext.local both are same terms for your www.mywifiext.net , because it is local login page for your WiFi Range Extender Setup or you can try login into your Mywifiext.net login setup account via its default ip address i.e 192.168.1.250 . Now , see the Setup Steps to follow to login into your Netgear WiFi Range Extender Page:
- Plug-in your Netgear WiFi Extender into Powerline.
- Now , wait for it to Light up.
- Wait until the lights go solid green on your Netgear Extender Setup.
- In the meantime, Grab a desktop or a laptop.
- Open any web browser i.e google chrome or mozilla firefox.
- Now visit Default login URL i.e www.mywifiext.net or Mywifiext.local.
- Click on the New Extender Setup button to start with the setup.
- Enter the default Login credentials and finish the setup of your Netgear Nighthawk WiFi Range Extender.
Note: If you still face any trouble with setup of your New/Old Netgear WiFi Range Extender via its default login address i.e www.mywifiext.net or mywifiext.local or you can try its default login ip address i.e 192.168.1.250 and if you still face any problem don’t worry just feel free to talk to us.
How do I set up mywifiext.local?
Installing your Netgear Nighthawk WiFi Extender Setup with Mywifiext.local is a simple process. Only MAC or IOS devices can access the mywifiext.local setup page. Continue reading our next part to learn how to access mywifiext.local.
For the setting of mywifiext.local? The steps are as follows:
Wait for the power light on your Nighthawk WiFi Extender to turn solid before turning it on.
Take a look at a computer or a smartphone.
Visit mywifiext.local in your web browser.
Ascertain that your gadget is linked to the nighthawk extender network.
Follow the on-screen instructions to complete the Mywifiext local setup process.
Place the Extender in the chosen spot once the setup is complete.
HOW DO I GET ACCESS TO MYWIFIEXT.NET?
You’ll need a wireless device to access mywifiext.net. Go to the wireless management on your device and connect to the Netgear ext network.
To access mywifiext.net, follow these steps:
- Connect the Extender to the power source after unpacking it.
- Open a web browser once the extender is turned on.
- In the address bar, type mywifiext.net and wait for it to load.
- If mywifiext.net does not load, try the IP address 192.168.1.250.
- The Netgear genie screen will appear, prompting you for your login credentials.
- To manage or install your Wi-Fi extender, go to mywifiext.net and log in with your credentials.
- If properly installed, an extender may increase the range of your network, allowing you to gain service outside, such as in your garden.
- Extenders don’t take up much room. Most are one-piece gadgets that connect into a power outlet and resemble an enlarged plug-in air freshener.
- You can obtain a constant WIFI signal using a wireless booster, which will help you maintain a lag-free connection.
How Netgear Nighthawk Wi-Fi extenders works?
Netgear Login Page
The WiFi extender is simple to set up on a computer and subsequently on a mobile phone, but you can also set it up on a mobile phone using an internet browser. There is a webpage that explains how to connect the extender to an existing wifi network. Make sure the extender is positioned halfway between the existing wifi router and the dead zone. However, during the initial configuration, you can place the extender near to the wifi router; once the setup is complete, you can move the extender to a low-signal range.
192.168.1.250
How Do You Get To 192.168.1.250?
Follow the steps below to get to 192.168.1.250.
- Open an up-to-date web browser on your laptop or PC.
- Then, in the address bar, type 192.168.1.250, which is the Mywifiext login IP address.
- You’ll be transported to the Mywifiext login screen after entering this IP address and pressing the enter key.
- The first item on the list is
- To go to the page, you must first log in with your username and password.
Mywifiext.net Setup Login help:
How to connect with Mywifiext.net Setup Page?
Mywifiext is a local web address or domain used by Netgear to set up and configure their range of Wi-Fi range extenders. Wi-Fi range extenders, also known as Wi-Fi boosters or repeaters, are devices that extend the coverage of your existing wireless network by repeating the signal and providing a stronger Wi-Fi signal to areas with weak or no coverage.
When you purchase a Netgear Wi-Fi range extender, it needs to be set up and configured before it can extend your existing Wi-Fi network. To do this, you need to connect your computer or mobile device to the extender’s Wi-Fi network and then access the Mywifiext web address in a web browser.
Here’s how you can use Mywifiext to set up your Netgear Wi-Fi range extender:
Physical Setup: Plug in the Wi-Fi range extender into a power outlet in an area where you want to extend the Wi-Fi coverage. Make sure it’s within the range of your existing Wi-Fi router.
Connect to Extender’s Network: On your computer or mobile device, go to your Wi-Fi settings and look for the network name (SSID) of the extender, which is usually something like “NETGEAR_EXT” or similar. Connect to this network.
Open a Web Browser: After connecting to the extender’s network, open a web browser on your device.
Access Mywifiext: In the address bar of the web browser, type “http://mywifiext.net” or “http://192.168.1.250” (the default IP address for Netgear extenders) and press Enter. This will take you to the Mywifiext setup page.
Login to Mywifiext: On the Mywifiext setup page, you will be prompted to enter your extender’s default username and password. The default credentials are usually “admin” for both the username and password (without the quotes). If you have changed the login credentials before, use the updated ones.
Setup Wizard: Once you have logged in, you might be guided through a setup wizard that will help you configure your extender. Follow the on-screen instructions to set up your extender and connect it to your existing Wi-Fi network.
Placement: During the setup process, the extender might perform a site survey to help you find the best location to place it for optimal Wi-Fi coverage.
Complete Setup: Once the setup is complete, your extender will be configured and ready to extend the Wi-Fi network.
Remember to keep your extender’s firmware updated and secure by changing the default login credentials. Also, ensure that you place the extender in an optimal location to maximize its effectiveness.
If you encounter any difficulties during the setup process, you can refer to the user manual provided with your Netgear Nighthawk Wi-Fi range Extender Setup or reach out to Netgear support for assistance.
How do I configure an extender with mywifiext?
Setting up an extender with mywifiext:
- Your wireless device must first be connected to the Netgear range extender.
- Go to http://mywifiext.net in any web browser.
- Hit the New Extender Setup button.
- Make an account on mywifiext.net now.
- Choose your current Wi-Fi.
- Enter your network security key and click Next.
- Allow the extender to finish the setup process in two to three minutes.
If you receive the message “Username and password is incorrect,” it means that both are wrong. When you select the “Forget” option, you will be prompted to provide the answers to two security questions before your login information is displayed.
Mywifiext Setup
How Do I Connect With
While attempting to access www.mywifiext.net or the settings website of Netgear, you could run into a variety of issues. The IP address and the cache of the browser are a couple of the most typical mistakes.
- However, by doing the actions outlined below, you can quickly fix this problem and gain access to the settings page:
- Make sure the router and mywifiext extender are stored in the same room and at the proper distance from one another first.
- Additionally, connect the extender to a power source and see whether the LED light on the gadget begins to flash.
- Call the expert for a prompt resolution if you are unable to log in to the mywifiext website.
- The next step is to establish a connection between your laptop or PC and Wi-Fi extender.
- Finally, you should configure this machine with a single static IP address.
Here, we’ve included some key information about the Netgear Extender Setup, like how to set it up using mywifiext.net. Additionally, we have talked about the extraordinary way in which your internet speed can be increased. We have included instructions on how to easily visit the mywifiext setup page.
How to install Netgear Extender using Mywifiext Login Setup Page?
The procedures to configure the Netgear extender using mywifiext are described in this portion of the article. Therefore, it is advised that all users follow the accompanying instructions to successfully complete the setup.
Note: Both manual and WPS setup options are available for the Netgear extender. We’ll talk about the manual approach here.
Note: Web browser setup is another name for the manual technique of configuring the Netgear extender. You can now follow the guidelines listed below: –
- Turn on the Netgear range extender by plugging it into an electrical outlet.
- The extender should then be connected to each user’s Wi-Fi device, it is advised.
- Open your computer device, start the network management, and join it to the Netgear ext SSID after that.
- You need to open one of your preferred web browsers in order to proceed with the setup.
- Enter mywifiext.net in the address bar.
- Press the “Enter” key after that.
- You are now being directed to Netgear’s official Wi-Fi extender login page.
- You will be prompted to enter the extender network’s login and password at this point.
- Users won’t be able to access the log-in page if their extender isn’t connected to their computer, though. All users must therefore connect their extenders to the PC.
- Users who do not already have a Netgear extender account must establish one in order to complete the setup process using mywifiext.
- Therefore, you should select “Next” after setting up or logging into the Netgear extender network.
Congratulations! You have completed the mywifiext Netgear Wifi Extender Setup successfully. As a result, you may now put your extension anywhere. Additionally, link it up to the Netgear ext (SSID) for seamless, continuous internet connectivity.
Mywifiext Netgear Extender Guide
How to access mywifiext.net?
Follow the following steps:
- Connect the booster to a power outlet.
- Watch the LED now for it to become green.
- Connect to the extender once the power light has turned green.
- The gadget’s LED ought to turn completely green.
- Open the address bar in any browser.
- Fill in Mywifiext.net
You can visit the mywifiext page in this manner. We will provide hints for the mywifiext login procedure in the following post. If you are still experiencing trouble connecting to the configuration page for the Netgear extender. For better support, call our toll-free number or utilize our live chat feature.
Steps for mywifiext.net setup troubleshooting
- If you entered the incorrect website URL.
- In the address bar, type mywifiext.net setup.
- if you are nevertheless utilizing an outdated internet browser programme.
- If your main Wi-Fi setup and Netgear extender are identical.
- any setting problems with your Windows Firewall.
- If you’re experiencing SSID and pre-shared key problems.
- Make sure you are always connected to the Netgear_ext network.
- No server could likewise be identified at http://mywifiext.net.
- If difficulties with reaching the 192.168.1.250 IP address due to an IP conflict continue.
Nighthawk Extender Setup Guide
How can I register for a mywifiext account?
- Make sure the new extender is hooked in and turned on in order to register for a mywifiext account. The Netgear wifi booster needs to be linked to your device as well.
- Let’s discuss how to set up a mywifiext account now:
- Username: In the username field, enter your email address.
- Password: Enter an 8 or more character alphanumeric password, or make up a memorable one.
- RE-Enter Password – Type the same password you just made in again.
- Select a security question from the list and provide a response.
- Select a security question from the list and respond to it.
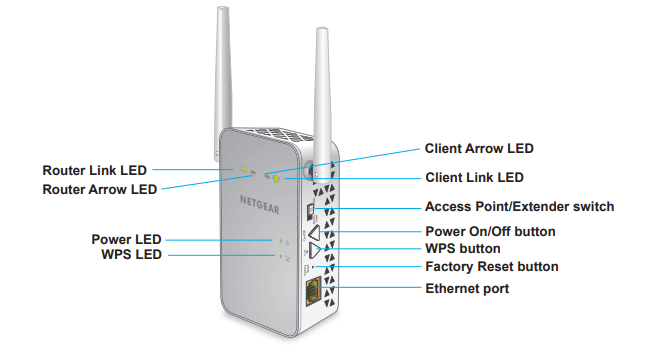
Netgear WN3000RP Setup Guide | Mywifiext Guide
Mywifiext.local – what is it?
Similar to mywifiext.net, mywifiext.local is mostly used to configure Netgear nighthawk extenders. The technology and performance of the Nighthawk Extenders are highly advanced. Follow these steps to connect to Mywifiext.local:
- You can use your computer or a mobile device to access mywifiext.local.
- It may take the extender up to 1-2 minutes to start up.
- After turning on the Netgear Nighthawk Extender.
- To complete the setup procedure, go to https://mywifiext.local setup page.
Netgear Nighthawk AC1200 Extender Setup
How To Access Mywifiext.net Login page?
Let’s discuss the steps we will follow to setup Mywifiext.net Login account:
Below Mentioned are few Steps:
- Plug in your Nighthawk Wifi Range Extender into power outlet.
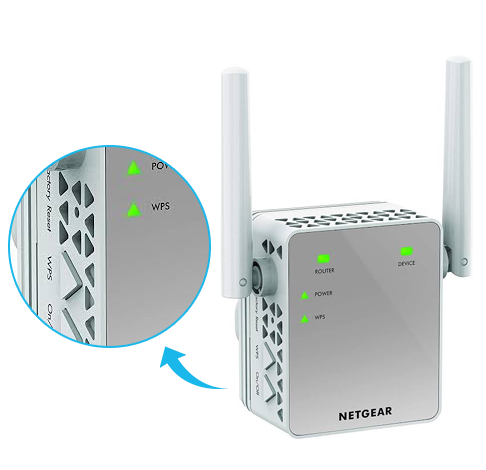
- See the Light Status on the Netgear WiFi Extenderc.
- Now, Grab a laptop or a desktop.
- Open any web browser like google chrome , Mozilla firefox , Edge etc.
- Open the default login URL i.e www.mywifiext.net.
- Now Click on the New Extender Setup Button.
- Now enter the login credentials of your Mywifiext login account.
- Hit the finish button.
Note: Mywifiext.net or Mywifiext.local both are same terms for www.mywifiext.net , if you still face any trouble regarding your Mywifiext.net login account try default IP address i.e 192.168.1.250.
Netgear EAX15v2 Setup Guide
Mywifiext.net setup Guide
WHAT IS THE MYWIFIEXT.NET LOGIN PROCESS?
You’ll need a wireless device to access mywifiext.net. Go to wifi management on your device and join the Netgear_ext network.
How to sign into mywifiext login account:
- The Extender should be opened up and powered on.
- Open a web browser after turning on the extender.
- In the address bar, type mywifiext.net and wait for it to load.
- If mywifiext.net still won’t load, try the IP address 192.168.1.250.
- The Netgear genie screen will appear and request your login information.
- To manage or install your Wi-Fi extender, sign in with your details at mywifiext.net.
How do I set up mywifiext.local?
You may install your Netgear Nighthawk wifi extender using mywifiext.local. On MAC or IOS devices alone are you able to access the mywifiext.local setup page. Accessing mywifiext.local is easy if you move on to our next section and thoroughly study it.
To set up mywifiext.local? the following steps:
- Wait for the power light to turn solid after turning on your Nighthawk WiFi Extender.
- Grab a laptop or a smartphone.
- Visit mywifiext.local in a web browser.
- Ensure that your equipment is linked to the nighthawk extender network.
- Follow the instructions displayed on screen to finish the Mywifiext local setup process.
- Place the extender in the chosen spot once the setup is complete.
Mywifiext Setup
Netgear Nighthawk AC1200 Setup
Setup for Mywifiext or mywifiext.net Guide
- Connect your device to the Netgear_ext network to complete the Mywifiext setup instructions.
- Any web browser, such as Google Chrome, should be opened.
- Navigate to the browser’s web address bar.
- In the address bar, enter 192.168.1.250.
- Click on the new extension setup button when it appears.
- Register right away, and Clicking Continue will launch Mywifiext setup.
WHAT IS THE MYWIFIEXT.NET LOGIN PROCESS?
You’ll need a wireless device to access mywifiext.net. Go to wifi management on your device and join the ‘Netgear_ext ‘ Network.
How to sign in to My WiFi Ext:
- The Extender should be opened up and powered on.
- Open a web browser after turning on the extender.
- In the address bar, type mywifiext.net and wait for it to load.
- If mywifiext.net still won’t load, try the IP address 192.168.1.250.
- The Netgear genie screen will appear and request your login information.
- To manage or install your Wi-Fi extender, sign in with your details at mywifiext.net.
Note: If you still face any trouble regarding your Netgear WiFi Range Extender Setup, feel free to talk to our Network Expert Technicians 24*7.
- Connect the wall outlet to the extender.
- Grab a device and connect it to the ‘Netgear_ext’ wifi and open any browser.
- Go to the new extender setup page.
- You’re at the mywifiext login page for the wifi extender.
- Create a login setup account and finish by clicking on the finish button.
Note: If you still face any trouble configuring your New WiFi Range Extender Setup you can contact our Mywifiext Setup experts 24/7.
- Connect WiFi Range Extender into the power socket.
- Go to the WIFI settings on your computer or laptop.
- Choose “Netgear_ext” network.
- Go to the web URL i.e www.mywifiext.net or Mywifiext.local.
- You’ve arrived at the setup tab for the WiFi range extender.
- Create an account and login into mywifiext setup account.
- Connect the extender to the main router’s power outlet.
- Go to your portable computer’s WIFI settings.
- In every web browser, choose the “Netgear_ext” network.
- Now, in the address bar, enter www.mywifiext.net and hit scan.
- You’ve arrived at the wifi range extender configuration tab.
- To connect your extender to an existing network, create an account and follow the instructions.
I can’t access www.mywifiext.net; what do I do? has troubleshooting information. Specify your login information. Note: The default username and password are respectively admin and password.
On your smart device, open a web browser. In the address bar, type www.mywifiext.net. The mywifiext login page is now visible. Enter your username and password in the fields provided.
How to use Mywifiext.net Login Setup
- Activate the WiFi range extender.
- Open your preferred web browser now.
- Open www.mywifiext.net.
- Click on New Extender Setup button.
- Enter the default login credentials for your Mywifiext login Page.
- Click the Go button when finished.
Verify that the extender is properly connected to the power outlet. The WiFi extender cannot receive a correct IP address from the router. The extender’s software and firmware are out of date. You are attempting to connect a variety of incompatible range extender brands to your home network.
- Connect the WiFi Range Extender cord.
- Join the WiFi network provided by the extender with your PC or mobile device.
- Open a browser and type 192.168.1.250 or mywifiext into the address bar.
- Tap or click NEW EXTENDER SETUP.
- Select the admin credentials for your extender.
- From the drop-down menus, pick two security questions, and then respond to them.
The sign-in page appears. I can’t access www.mywifiext.net; what do I do? has troubleshooting information. Specify your login information. Note: The default username and password are respectively admin and password.
Using a paper clip or pin, press and hold the reset button for 10 seconds to reset the extender. After the extender has finished rebooting, join your device to the standard SSID (NETGEAR EXT). You will be immediately redirected to the extender setup page when you launch a browser.
Find the Reset or Factory Reset button on your extension. The button is typically concealed behind a tiny hole on the side or bottom panel of the extender. Press and hold the Reset or Factory Reset button while using a straightened paper clip or other similar-sized object until the Power LED begins to blink. Up to 10 seconds may pass during this.